Altitude Industries iKamper Dealer and Overland Gear

Altitude Industries iKamper Dealer and Overland Gear
Trailers, Kitchens, Overland Gear, Rooftop Tents

Altitude Industries - iKamper Skycamp Rooftop Tent Dealer and Overland Gear!

One of the best ways to explore the world, is the overland route!  The Jeep JK Unlimited makes a fantastic platform to accomplish this!  You can read about the Gobi Stealth rack on my jeep on this blog.  I have since mounted several rooftop tents to this rack, and it has worked flawlessly.  The most recent, is the new iKamper Skycamp rooftop tent.

Altitude Industries is located in Evergreen, Colorado just outside of Denver. We are an authorized iKamper Dealer and carry the new Skycamp rooftop tent. Its the ONLY 4 person hardshell rooftop tent on the market, and can be setup in less than 1 minute!  Once open, you can fit your whole family inside comfortably on the king size mattress!  Closed, its a compact, sleek, aerodynamic hardshell. Come visit out showroom to see what makes it so special!  We know you'll be as impressed as I was when I received my tent at the Overland Expo West last May!  Its what made the Skycamp the most successful tent campaign of all time on kickstarter selling near 1000 tents for $2.4M.

visit www.altitude-industries.com for more infomation!


Read more!

Warn Powerplant HD - Combination Winch & Air Compressor


Sometimes things don't go the way you plan. This winch was one of those times.


I originally wanted a Smittybilt XRC10HD winch. It is the only other air compressor and winch combo on the market besides the Warn,except its HALF the price. Well, the problem turned out to be it really isn't "on the market". Let me explain. I originally placed an order with 4wd.com. After a month had gone by and the winch hadn't shown up in the mail, I called to see what was taking so long. They said it was on backorder and the expected stocking date wasn't for another month. I canceled my order figuring I could get it somewhere else that had it in stock. I called around but nobody had it... and I posted my frustration on JKO. RMD Offroad emailed me and explained that they were taking preorders, because the winch hadn't arrived from China yet, so nobody had it. You would never know that from all the sites selling the product. James was in direct contact with Smittybilt, so I placed an order with him. Every few weeks I'd check in with RMD, but the arrival date just kept getting pushed back. Finally after 5 months, I had had enough of Smittybilt's so called arrival dates and I canceled my order. Absolutely rediculous! Come to find out that the winch was still in "research and development" and all these people were out there selling it like they had it sitting in their warehouse. Nobody seemed to think it was a problem to just keep giving you false arrival dates. Finally I decided to spend the extra money and get a product that was actually for sale! Besides, its American made, not some knock off being reverse engineered in a factory in China. I ordered the winch and it was at my door no more than 3 days later!

Anyway, installation was a breeze. Everything comes totally assembled, you just bolt the winch in place and connect it to the battery. This winch has an internal air tank so you don't need to mount one somewhere under your jeep. The air compressor is powerful and it can keep up with air tools or airing up big tires without an external tank. That's a nice advantage over the smittybilt which needs a 2.5 gallon tank - where was I going to put that anyway!?
Before installation:
Back of the unit
I was able to slide the unit between the winch hoop (brush guard) and the front grill... BARELY.  Good thing, otherwise I'd have to take the bumper off, install the winch, and reinstall the bumper.
Here is what my battery is looking like already.. good thing I did the auxilliary fuse box previously.

After the winch was installed:


I was amazed only these 4 small bolts hold the winch onto the bumper.  I was expecting some beefy 3/4 bolts, but these are tiny, maybe only 3/8 or smaller.  The back bolts were tough to tighten because of the frame cross member. 


Read more!

Superchips Flashpaq

Fix your speedometer after you lift. Get better gas mileage, more horsepower, trailer towing, etc..


How much you speedometer will be "off" after a lift depends on what size tires came stock on your vehicle, what size tires you added, and what speed you are going. For me, going 65 on the highway was actually more like 75 or 80mph! That's a recipie for tickets. There are various devices out there that will fix the problem by reprograming your computer. There are extensive debates on JKO and JKF about which tuner is better, but I decided to go with the Superchips since it seemed the most widely used. When you are messing with your jeep's computer system, you want to use a proven product.

I have yet to keep track of mileage with and without the tuner. I've read it can improve your mpg's quite a bit. The jeep drives better after the tune, with less delay when you hit the gas and smoother engine operation. It also has a towing tune, which is good for me with my offroad trailer. Other jeep specific options include higher idle for winching and locker operation options.
Read more!

Soft Top Saga

What is one of the best things about a jeep? Going topless! But achieving jeep top nirvana is harder than it seems.


When I purchased the Jeep at the dealer, I got the dual top option.  I also got the Gobi Roof Rack, but I never considered how the two would work together.  I had a big "DUH!" moment when I tried to install the soft top for the first time.  The factory soft top uses an internal framework and the top folds up and down.  As it folds, it requires quite a bit of vertical height for the arms of the frame to swing back.  With a roof rack you only have about 4" between your top and the bottom of rack, no where close to enough room to fold the top back.  So....  Gobi thought of this, and they designed the rack to fold back also.  But you have to unbolt it at the windshield frame to fold it back, not exactly what you want to do just to run to the grocery store!  I decided to sell my soft top while it was still unused and in the box.  I got $650 for it on craigslist, so I broke even since the dual top option was about that much when I bought the jeep.  I decided to use the money to buy a Bestop Trek Top.  It uses the roll bars as its internal framework (except the door surrounds) and the top just rolls up like a roll of carpet.  So, you can put it on and off under the rack.  Problem solved! Or so I thought...   Here is what the Trek Top looks like with the part over the driver's cab rolled back:


Well, things didn't start off so good. When I installed the top, it was so tight that it ripped at one of the windows trying to stretch it into position.

The next challenge was getting the header bar to seat properly on the top of the windshield frame.  It has a bow to it to keep things tight, but its SO tight I had to use gloves and literally HANG on the header with all of my weight just to get it to seat down far enough for the screw to thread.  I drove the top for a couple weeks and it never got any easier.  Here is how the header connects through the footman loop above your sun visors:

Again, not something you want to do to run to the grocery store.  If you got caught in the rain you would be flooded out before you could get the top latched properly.  This was a dealbreaker for me.  So, I packaged it up and sent it back to Quadratec.

The next product I have decided to try is the Offroad Heros (California Tops) JK Whisper top or Cargo Top.  They are essentially the same as a Trek Top, but the windshield header is built differently.  We'll see how it works.  I've heard the wait times for these can be insane, like 3 or 4 months.

Read more!

Spidertrax Wheel Spacers


Spidertrax spacers add 1.5" on each wheel to your axle width.


I decided to add wheel spacers for two reasons. The first is to make my stance wider to help avoid roll overs since I have a 6" lift. I alomst rolled my old TJ a couple different times and I don't ever want to experience that in a jeep this expensive. The second was to move my wheels out from my lift kit. The rear sway bar end links have bolts that come too close to the tires for my taste. Also, the bolt was scraping my frame at full stuff, so by moving the end link to the outside of the sway bar I gain some clearance from the frame.

The spacers are easy to install. I took it out for a test drive and it drives like normal.

I found one of the pairs on Spidertrax's website on the "outlet" page. That's why the color of the two are different. You don't ever see these unless the wheel is off, so I'll take the discount!
Read more!

Teraflex Kit Issues

I love the 6" Elite LCG kit. It drives great on the road and performs great offroad. However, I've found some small problems.


Fully flexing out the kit in Moab brought to light some problems. I brought the jeep back to HCP4x4 where the lift was installed. I was told by a different shop the stock spring spacers had not been put back in like the tereflex kit calls for. HCP4x4 said they were in there and my issues where due to my heavy bumper and rack. They installed 1" spring spacers. I'm trying to get to the bottom of that issue.

Anyway, here are the places the kit is rubbing.

1.  Rear bump stop extension pad is rubbing track bar bracket bolt.


2. Driver's side rear sway bar arm is rubbing frame at full stuff.

3. The inner fender plastic is hitting the tire. I think this is what is making most the noise.  I will be trimming these and getting rid of the fenders when I put on tube fenders.

4. The rear driver's side shock is hitting the track bar bracket. 

I'm not sure how you fix some of these.  HCP4x4 claims "this is normal and all JK's with the teraflex kit do this".  If I get any updates I will post.

Read more!

Shift Knob


The stock shift knob is a little boring. I probably won't keep this, but its fun to mess around with.


To get the stock knob off, I took a 5/8" crescent wrench and put it under the knob around the shifter shaft. I took a rubber mallet and hit it up a few times, it popped right off. The jk shifter knob is not threaded.

I took a 9/16" drill bit and put a 2" deep hole in this resin skull I got on ebay. I think it feels too big in my hand, so I am ordering a smaller one. The one I have on there now is nearly 4" long, 3" wide and 3.5" tall. Too big.
Read more!

Cobra 75 CB Radio

Having a CB radio is a requirement for most jeep clubs.  Its also useful for weather updates and if you get into trouble.


The kit comes with a handheld unit that includes most of the normal functions that are in a larger traditional cb radio "box".   You just need a small amp which can be located somewhere out of sight.  I chose the location under the glove box.


When you take out our glove box, this what you see.  You can mount the amp right to that metal bracket, like this.  It took some creativity trying to drill the hole and get the screws mounted with such a small space to fit the drill into.


After getting that installed, I took the plastic panel off that fits below the glove box.  I drilled a hole and installed the cb quick disconnect.  This way, you can just store you hand held in the glove box and only plug it in when you need it.  Next I ran the long cable from the amp to the rear of the jeep.  I took the plastic cover off the inside of the tailgate.  I used the existing hole here (had to enlarge it a bit with a 3/4" drill bit) to run the cable inside the tailgate.


The cable comes out the back side of the tailgate here.

There is a rubber stopper in this location that looks like this


I drilled a hole in the center of it, then cut a slit in the bottom of the stopper up to the hole with a bandsaw.  This allowed me to slide the stopper around the cable, and then insert the stopper back into the hole in the tailgate, like this.


I fed the remaining cable into the inside of the tailgate, and then snapped the cover back onto thet tailgate.


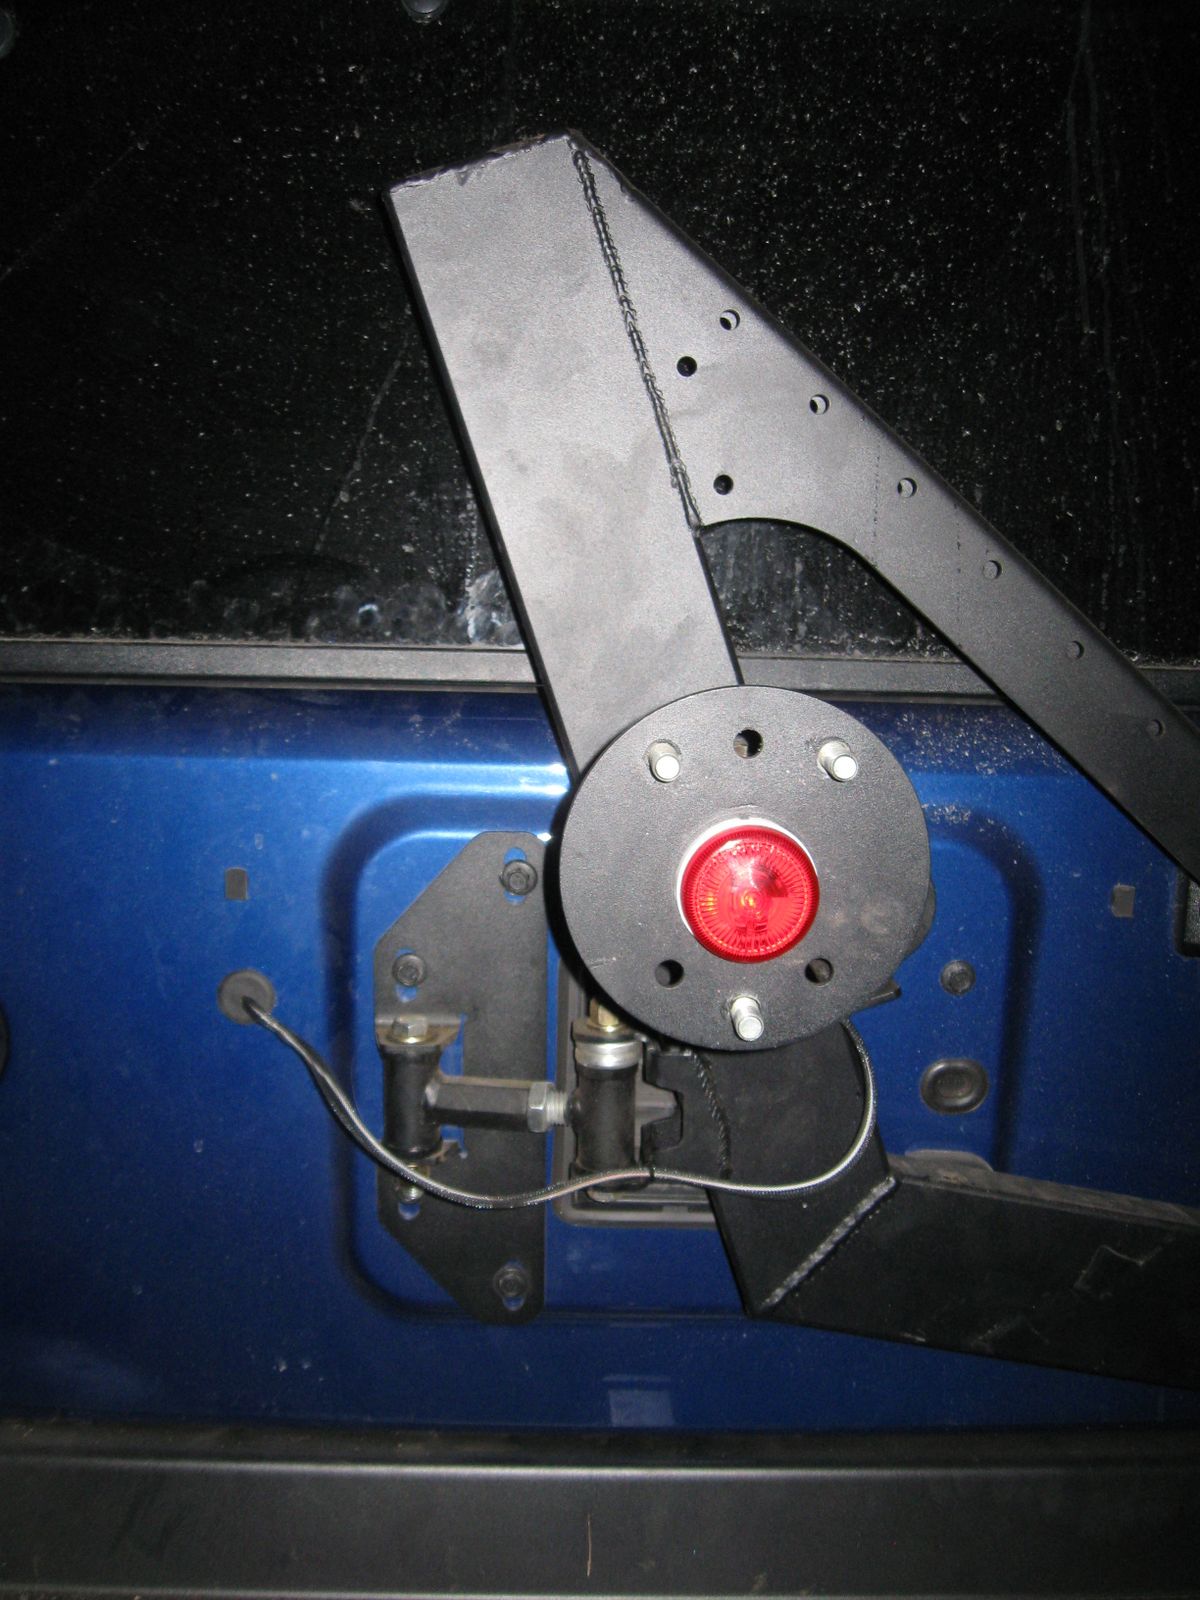
I threaded the cable onto my cb antenna mount that I ordered with my Expedition One tire swing.


I wired my cb radio through a switch in the dash and then to my custom auxilliary fuse panel.  See my previous posts for install info on those mods. 
Read more!

HD Customs Rock Sliders


Want bulletproof custom sliders, welded to your frame for the cost of bolt-on's?


I was originally all but set on ordering some Shrockworks rock sliders. But I realized that with the long arm lift, the bolt on product might not work. Bolts on's require you to drill your frame and the brackets are in a fixed position front to back. When you have a long arm lift, your stock control arm brackets are cut off an new ones are welded in a different place. A lot of rock slider - lift kit combinations interfere. So, I called Shrockworks and they said the best they could do was ship the rear arm "loose" and I would have to get it welded to the slider once I knew the correct positioning. That also meant I'd have to fix the powder coat. This seemed like a jerry rig solution of sorts. So, I decided to go full custom. At the same time, I met Jarrett from HD Customs through my jeep club. He does amazing fabrication. So, I brought him some photos of the type of slider I wanted and he made them from scratch. Here is how the turned out!
I had him cut my pinch seam and cut back the stock rubicon sliders.
As you can see, I left the stock rubicon sliders in place.  I looked at a bunch of photos of this style slider and I felt it left an awkward gab between the slider and the bottom of the body tub.  Besides, if my new sliders ever were to bend (which I thin is near impossible) the stock slider would provide additional support.

Read more!

Rock Hard 4x4 3rd Brake Light


In some states, a third brake light is legally required. I decided to add one for added visibility regardless of the law in Colorado. The light only costs about $15 from Quadratec.com


Here is the kit:


Once you pop off the red plastic lens, you can see that its just an incandescent light bulb and two power leads. 


The stock jeep wire harness used to plug into this spot on the back of the 3rd brake light.  You can see that there were two pins.


I just cut a Size 8 stud crimp connector in half to make a "pin" for the end of each wire.


The I plugged these into the stock wiring harness and tapped it all in place securely.   Then I traced the holes in the plastic backing of the light onto the spare tire mounting plate.  Unfortunately they didn't quite line up with the pre-existing holes in my Expedition One carrier.  I drilled out the holes.


Here you can see the stock wire and wiring harness with the Hard Rock brake light attached.

Screw the white plastic backing onto the tire carrier, and then snap the red lens back on.


That's it, you are done!   Ok, maybe not.  The light didn't work.

Turns out I blew a fuse.  That's because the white wire has a stud crimp connector on it (the hoop) which the screw goes through.  The screw is bolted into raw metal in the tire carrier which is connected to the frame, adn therefore grounded.  So every time I hit the brakes, a ground fault ocurred and blew the fuse.  I had to go back into the light and use a dremel to cut out part of the copper away from the mounting hole.  Then I re-drilled a new hole to attach the white wire to the copper, leaving the mounting screw electrically disconnected from the white wire/copper.  No more ground fault and the light works great.


Read more!
Site Meter